Introduction
The whole project is a local area network called Athernet which has a physical based of sound. It is finished as the final project of Computer Network course together with my teammate Yimin Tang using JAVA and Python(only in the NAT node for Internet access).
We implemented the whole network structure from the basic physical layer to the the application layer with FTP function. Together with an NAT node, Athernet node is able to connect to public FTP servers. The structure of the network is shown below.
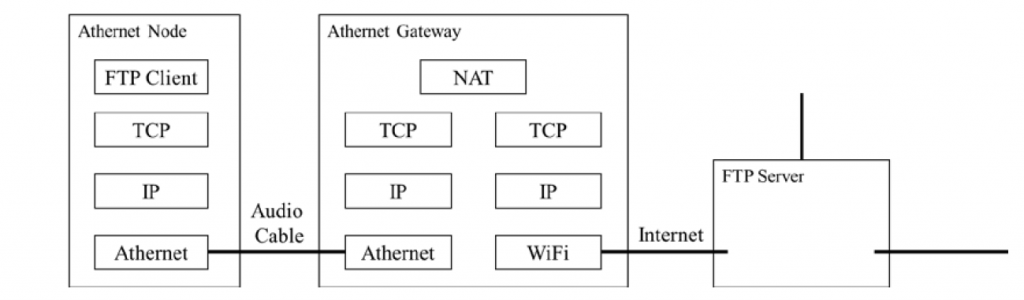
Physical Base:The Sound
In Athernet, all of our messages and information are based on the sound wave. This is kind of troublesome because at first the sound was transferred by air. Lots of noise was added to the final signal that the other node received. The quality of the speaker would also influence. When we want to increase the byte transform speed, it become a mess. Then we decided to use audio cable to transfer the sound wave and everything works great. However, the experience of the poor quality of the signal transform truly increased our physical layer’s robustness which help a lot in the following steps.
Modulation & Demodulation:ASK
The first several steps are simple and have no value to discuss. The first crisis and choice of the network is the way you modulate and demodulate the signal. We have the file we want to transfer and we can change the file to binary form. Once we have a serious of numbers 0 and 1, they can indicate a signal wave: 0 means low signal and 1 means high signal. There are many ways to modulate this signal wave into carrier wave (in this situation is a specific frequency of sin sound wave). PSK, ASK and FSK are three commonly used methods of modulation. We at first choose FSK as our modulation technology.
We choose two different frequency of sin sound wave (5 kHz and 10 kHz) which may have more than 2 times difference between each other. After calculating the sample rate of the sound wave (44 kHz) and the sample number for each bit of the data, we start to transfer bit array to sound wave. For a bit array, if the processing bit is 0, we add a low carrier wave at the end of the signal wave otherwise we add a high carrier wave. This works fine at first. The tricky thing is when later we need a higher speed. Then the sample number per bit is reduced to 6 or less. In this way it is hard to judge whether it is a low carrier wave or a high carrier wave.
We finally choose to use ASK in our project. This is simpler than FSK to judge the signal as you just need to find out whether the average signal in a period is high or low. We try to keep the signal at zero for these 0 bits. This would not work as the speaker can not deal with the change of having signals or not in such a short time. Then we have to use the same frequency of carrier wave all the time and make the amplitude of the signals different.
Synchronization
An important request for the successful of demodulation is synchronization. This means that you have to clearly know when a frame starts. The less of the sample number per bit, the more accurate start point is needed. If the sample number per bit is 6 or less as what we did finally, the synchronization becomes a very hard problem. We use two method to solve this.
The first method is to increase the length of the header. We use a queue to store data with header’s length. Every time we multiply the queue with the origin header and check the cross product. However, this does not work very well as it is hard to judge the specific limit of the cross product of the received signal and the right header. If we set the limit to a high level, some header might not be detected due to the influence of noise. If we set the limit to a low level, all the header would be detected but the start point is then hard to decide because the point that reach the limit might be ahead or after the actual point.
In order to solve this problem, we think out a great idea: add zero signals after the header. We add a specific number of zeros after each header. When the program detects a header, it will keep reading some signals. We will first read number of zeros we set and then keep reading if the signals we get is still zero. The first non-zero signal is the actual start of our frame. This is very efficient and easy to realize. The only problem is that the zero signal sometimes becomes little signal wave under 20, we have to write a specific algorithm to deal with this.
Other Things: Variable-Length Frame & Error Detection
We add some other features in physical layer. The two most helpful are variable-length and error detection. We put a number shows the length of this frame at the beginning of all the data. At the end of the data, we put two numbers shows the number of 1 and 0 in the frame data. In this way, we can check whether the data have been correctly transferred. We can also dynamically change the length of each frame using the first number. To prevent that we read the wrong number of frame length, we set a limit of the max length. If the number is not the actual number, the number at the end of the frame would not be right. If the number is too big, we will just stop recording this frame as there is something wrong.
We also write a specific function for reading the signal. As we can only read in a serious of data, it is some kind of hard to get one signal at the same time. Besides the buffer that the system library provided, we write our own buffer to get a better experience of dealing with the data.
MAC
Medium Access Control layer is just on the physical layer and its realization need the physical layer to be reused a lot of time. The sound is transformed by wire which makes a great difference with the previous plan. This led to a result that we spent more than half of the time on changing the physical layer and have little time writing the MAC part. Finally, we only realize the state machine of MAC’s send-and-pray protocol but not include the CSMA.
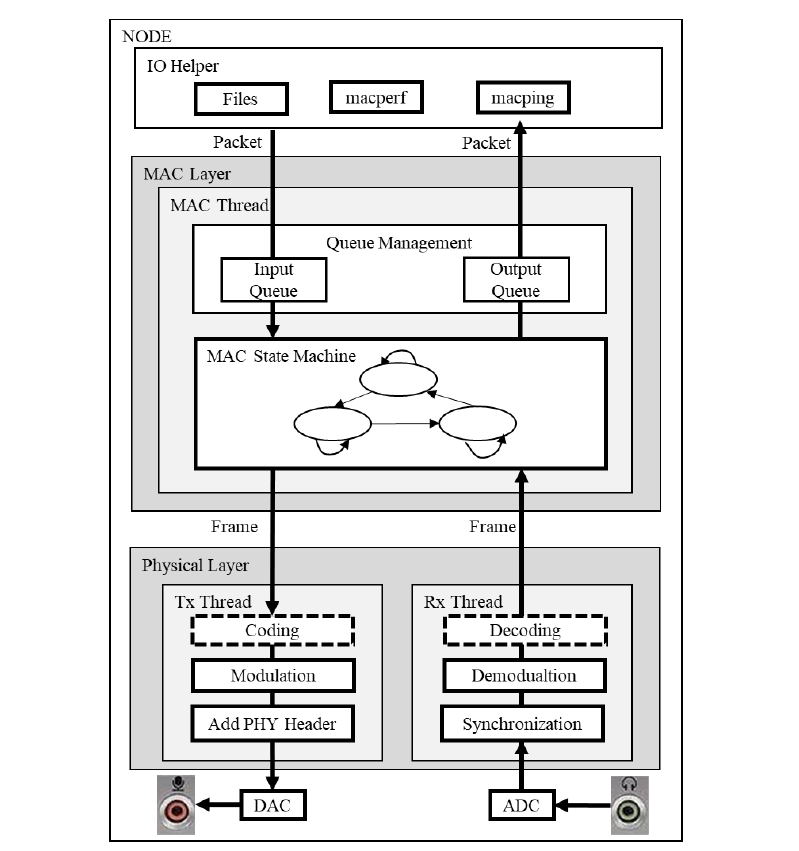
Rewrite Physical Layer
To realize MAC state machine, we need to make the sender and receiver as interface functions and easy to use. We design two interfaces for this mission, one is for send and the other is for receive. The receive part is different as it has to work all the time during the lifetime of the state machine. We make it runs in another thread and use signal communication between threads to realize the message exchange inside the MAC state machine.
We set a flag and a buffer for common resources between MAC and receiver thread. The flag is to show the state of the buffer. If the buffer is now reading by MAC, the receiver would not write frames into the buffer even it just got a new one.
The sender is an independent part of MAC. It just needs to send the data and return a success flag to show whether the data has been sent correctly. It can runs in another thread but we did not let this happen as this may influence the receiver’s activity.
ACK & Timeout
As our physical layer support different length of data, our ACK design is then simple and efficiency. We set a 4-bit flag at the beginning of data to show the ACK’s state and add a 128bit length random 0/1 to make sure the ACK is send correctly. We use the stop-and-wait strategy to wait for the ACK.
When the sender node sends a frame of data, it will set a time counter to mark the start time of the sending. Every time in the frame detection state, the sender node will check the time counter and find out whether the reply ACK is out of time.
We also set a flag for resend the data frame. If we receive an ACK representing fault result, we will set this flag and the resend the previous frame. Only after receiving the right ACK can we go on sending the next frame.
Summary
We also implemented the NAT node together with the FTP, UDP and IP. Those functions are not hard to realize and has little creative things during the process. The most interesting part of the whole project is how to use sound wave as the physical base of the network. We need to design and implement our own rules and structure for the physical and MAC layer which has a lot of fun.
Code Access
The full project can be found at my github repo.